How to care for and maintain the electrical system on the Simpro Multi-Tip bin lifter.
Overview
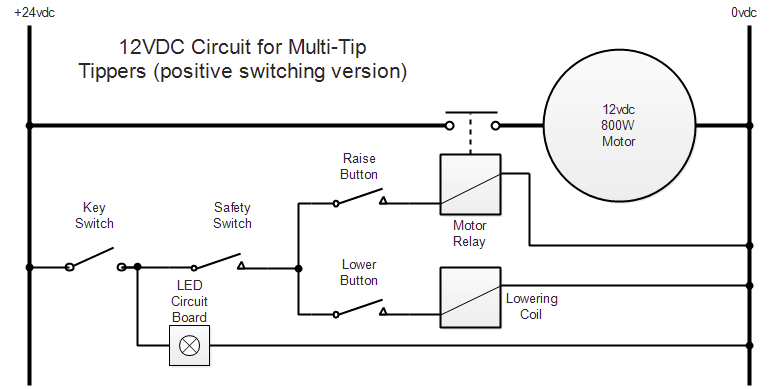
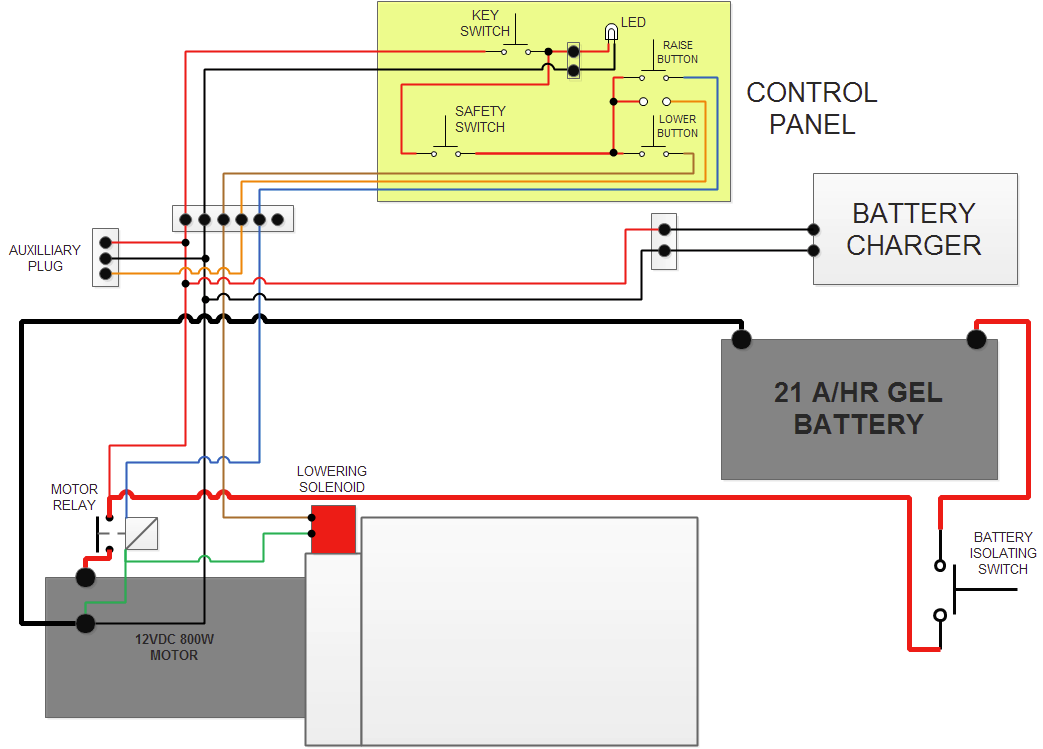
The Multi-Tip motor relay and lowering coil are connected to negative all the time, and the positive is switched in the handle controls. The positive signal goes through the Key switch, then the Safety button switch, and finally the Raise and Lower switches.
The standard Multi-Tip has no limit switches – the operator simply releases the buttons when the cradle is fully raised or lowered.
Ingress Protection
The Control switches are rated to IP 66 and the motor is rated IP55. The charger socket should be kept dry; if it gets wet, it should be dried before the charging lead is plugged in.
Battery
Battery-powered machines normally have a sealed 21 amp-hour gel battery mounted on a bracket at the right-hand side of the main box. Depending on the amount of usage, the battery should have a life of 2 - 3 years; if used continuously or not maintained correctly, the life may be reduced.
The battery should be kept clean and dry by wiping with a soft cloth, and both terminal clamps should always be securely tightened.
A larger 55Ah battery can be fitted if needed, which allows a lot more empties per charge but also takes longer to recharge.
Testing
Depending on the tipping height and other factors, a full charge of the battery should be sufficient to empty at least 2½ tonnes of product. If the battery will not hold sufficient charge, follow the steps below to test the battery:
- Remove the box cover panel.
- Measure the battery voltage with a multi-meter, with the charger disconnected.
- Plug the charger in, and measure the voltage again.
- Disconnect the charger, and measure the voltage again.
- Finally, measure the voltage while pressing the “Raise” button.
If the voltage increases when the charger is connected, but drops below 12 volts when it is disconnected, the battery probably needs replacing. If the voltage does not increase when the charger is connected, check the charger.
If the voltage drops more than 1.5 volts when the Raise button is pressed with no load on the cradle, the battery probably needs replacing. If you are unsure, or if the battery is less than one year old, return it to your battery supplier for testing.
If the machine has not been used for several weeks the battery may have gone completely flat. A battery that has been left discharged for several weeks can lose some or all of its capacity to hold a charge.
If replacement is necessary, ensure the new battery has equivalent specifications to the factory-fitted one.
Removal and Refitting
- Remove the main cover panel.
- Undo the terminal bolts.
- Bend down the retainer flap on the left with pliers or an adjustable spanner, and slide the battery out.
- When replacing, ensure the positive terminal is to the right, and that the red cable is connected to the positive terminal.
- Bend the retainer flap up again to hold the battery in place.
Battery Charger
The Multi-Tip is fitted with a digital float charger which accepts input from 85-264VAC at 47-63hz and has a maximum draw of 3 Amps.
Testing
If the battery does not hold its charge, or will not accept a charge, the fault may be either with the battery or the charger. Follow the steps below to determine whether the charger is working correctly:
- Remove the access panel on the main box.
- With a multi-meter in DC voltage mode, measure the voltage of the battery when the charger is not plugged in. It should normally be between 12.2 and 12.6 volts.
- Plug the charger in, and check the voltage again. It should quickly rise to around 13 volts, then slowly increase to about 13.7 volts.
- If the voltage doesn’t rise, check the wall socket, the charging lead, and the 2-way plug from the charger that connects into the loom.
If the tests indicate a faulty charger, contact Simpro for a replacement unit.
Removal and Refitting
- Loosen the screws holding the outer cover panel and lift it off.
- Disconnect the plug connecting the charger to the wiring loom.
- Bend the retaining tab down with pliers or an adjustable spanner, and slide the charger out.
- To replace, slide a new charger in, and bend the tab back up to retain it.
- Connect the wiring plug and socket.
Battery Isolator
A heavy-duty battery isolator is mounted on the side of the main box. This must be turned on before anything on the machine will work. It is primarily intended as a means of quickly disconnecting the battery in case of an emergency, or before doing maintenance. It is very unlikely to need repair or replacement.
Circuit Diagrams