How to identify and repair oil leaks from the hydraulic pwoerpack of a Simpro bin-tipping machine.
Possible leak sources
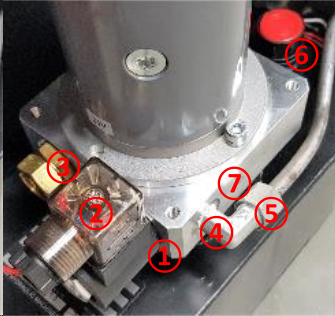 Possible sources of powerpack leaks
If oil is leaking from the powerpack, the first step is to positively identify where the oil is coming from. There are seven possible leak origins:
Possible sources of powerpack leaks
If oil is leaking from the powerpack, the first step is to positively identify where the oil is coming from. There are seven possible leak origins:
- The O-ring seal on the lowering valve
- The Dowty seal on the check valve (not visible)
- The O-ring seal on the pressure-relief valve
- The fitting in the pressure port
- The compression sleeve holding the steel tubing
- The breather plug on the hydraulic tank, or the tank itself
- A crack in the aluminium housing
Further details on each of these items follows.
1. O-ring seal on the lowering valve
The O-ring seal is normally very reliable and should not leak. However, it can be damaged while screwing the valve in, especially if the cavity has a sharp edge. It can also leak if not correctly tightened.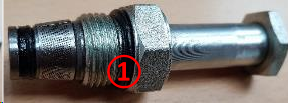 O-ring seal on the lowering valve - 16.36mm ID and 2.21mm cross-section
NOTE: the O-ring is not a common size - the ID is 16.36mm, cross-section is 2.21mm. Using other sizes will result in on-going leaks!
To check and replace
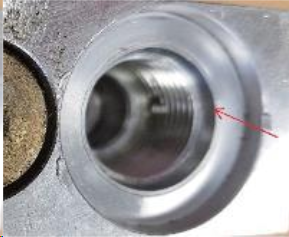 The red arrow shows the edge of the lowering valve cavity.
- Unscrew the nut holding the coil on the stem, and remove the coil
- Unscrew the valve body from the housing (7/8” spanner)
- Carefully inspect the outer diameter of the O-ring. If there are any signs of damage (cuts, nicks or roughness), it must be replaced.
- Check also the edge of the cavity (red arrow in the image). If it is sharp, force a small piece of rag into the cavity, then rub around the edge with emery paper. Wipe carefully to remove all traces of abrasive and metal, then pull the rag out.
- Using a small screwdriver or pick, remove the O-ring.
- Slide a new O-ring into position, and carefully screw the valve back into the cavity, then tighten firmly.
- Replace the coil and retaining nut. This nut should be tightened just more than finger-tight.
2. Dowty seal on the check valve
Normally, the Dowty seal is very reliable and should never leak. However, it may leak if the plug is not tightened fully.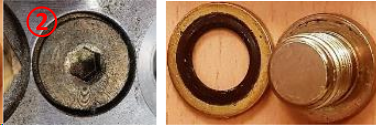 The Dowty seal on the check valve
To check and replace
- Unscrew the plug (6mm Allen key)
- Remove the Dowty seal (two parts – a steel outer ring and the inner seal)
- Put a new Dowty seal on the plug, screw in and tighten firmly.
3. O-ring seal on the pressure-relief valve
Normally, the O-ring seal is very reliable and should never leak. However, it can be damaged while screwing the valve in, especially if the edge of the cavity is sharp.
It can also leak if not correctly tightened.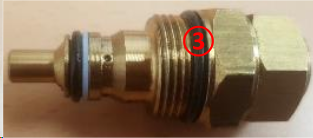 O-ring seal on the pressure-relief valve - 20mm ID and 2.0mm cross-section
NOTE: this O-ring is 20mm ID with 2.0mm cross-section. Using other sizes will result in on-going leaks!
To check and replace
- Unscrew the complete relief valve cartridge (15/16” / 24mm spanner)
- Carefully inspect the outer diameter of the O-ring. If there are any signs of damage (cuts, nicks or roughness), it must be replaced.
- Using a small screwdriver or pick, remove the O-ring.
- Slide a new O-ring into position, and carefully screw the valve back into the cavity, then tighten firmly.
4. Fitting in the pressure port
The fitting in the pressure port is usually an elbow fitting, with a ¼” BSPT thread on one side, and a 5/16” (8mm) compression fitting on the other side.
 The fitting in the pressure port, and the compression sleeve holding the steel tubing
The BSPT fitting should have thread seal tape or compound and be tightened firmly, taking into account the fact that it must be correctly oriented. Take care when tightening not to go beyond the correct alignment if you cannot do another complete turn. If you do, then turn it back, the thread seal tape may be damaged; in this case it is recommended to remove the fitting and re-apply thread tape.
The fitting in the pressure port, and the compression sleeve holding the steel tubing
The BSPT fitting should have thread seal tape or compound and be tightened firmly, taking into account the fact that it must be correctly oriented. Take care when tightening not to go beyond the correct alignment if you cannot do another complete turn. If you do, then turn it back, the thread seal tape may be damaged; in this case it is recommended to remove the fitting and re-apply thread tape.
5. Compression sleeve holding the steel tubing
The compression sleeve must be fitted the correct way around on the tubing, and the fitting done up tightly. Overtightening may cause the nut to split.
6. Breather plug or hydraulic tank
The oil level in the hydraulic tank goes up and down as the lift ram extends and retracts. The 'breather plug' must allow air to flow in and out of the tank as the oil level changes.
- Occasionally, the standard breather plug is replaced with a sealed 3/8” BSP plug during shipping, to prevent oil leakage. If a sealed plug has been fitted for shipping, it MUST be replaced with the supplied breather plug before use. If the machine is operated while the sealed plug is still fitted, the plastic hydraulic tank will 'implode' and leak.
- Generally, the oil level should be at least 25mm below the top of the tank, though occasionally it may have to be higher on machines with a very tall tipping height. If the oil level is too high it may leak from the breather plug as the cradle nears the ground.
- If foam forms in the oil, it can increase the oil volume sufficiently to cause a leak from the breather plug. There are two possible causes of oil foaming:
- Air is being pumped along with the oil. This can happen due to a misaligned oil intake, or a damaged hydraulic pump. The solution is to check the intake is correctly positioned at the bottom of the tank, or to replace the hydraulic pump.
- The oil is overheating. This can happen if oil is forced through the pressure-relief valve for an extended period of time, typically because an operator is trying to lift an overweight bin, or is still holding the 'Raise' button down after the cradle has reached the top of the cycle. The solution is to educate operators regarding correct use of the machine.
7. Cracked aluminium powerpack housing
A cracked housing is very rare but is a possibility if all other options have been checked.
If the housing is cracked, the entire powerpack must be replaced.