How to reassemble a Simpro MegaDumper which has been shipped in a dismantled state.
MegaDumper is sometimes shipped with the doors and side guards removed in order to reduce the volume. If more than one MegaDumper is shipped in a single consignment, the removed parts are usually numbered to assist with refitting them to the correct machine.
Reassembly can be done while the machine is lying down or standing up. However, it is best practise to refit the side guards, U-bars and brace panel while the machine is lying down, then stand it up before refitting the door.
Tools required
- Cordless impact driver with 8mm socket
- 7mm, 16mm, & 17mm spanners
- Crosshead (Phillips) Screwdriver
- Hammer
- 4mm Allen key
Procedure
- Remove the strapping holding the door locks to the base frame.
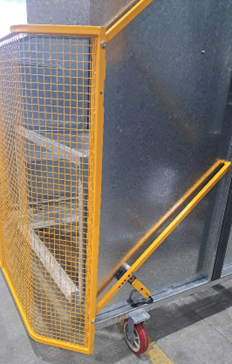
- Slide the top of the guard panels onto the 10mm pins welded to the mast, then back down onto the base frame. Screw the bottom flanges to the base frame with Tek screws.
- Slide both U-bars into the square holes in the front face of the side guards. Screw the top U-bar in place with Tek screws (don’t attach the lower one yet).
- Hook the brace panel over the top U-bar and rest it against the side guards. Fit the lower U-bar into the flange on the brace panel then attach it with Tek screws.
- Stand the machine up.
 The MegaDumper door should be lifted into position by two people, one on each side.
Prepare to install the door. Two persons are required for this task. Both should have two M10 x 65 coach bolts, ready to insert into the correct mounting holes in the side channels;-
The MegaDumper door should be lifted into position by two people, one on each side.
Prepare to install the door. Two persons are required for this task. Both should have two M10 x 65 coach bolts, ready to insert into the correct mounting holes in the side channels;-- If the machines has castor wheels, the door should be mounted on the upper holes
- If the machines has boltdown lugs, the door should be mounted on the lower holes
- With one person on each side of the door, lift it into position against the frame. Make sure it is the right way up (the handle should be below centre).
- Pull the upper arms right down against the pressure of the gas struts.
- Lift the door slightly, slide onto the upper arms, and insert the coach bolts through the correct mounting holes (from the outside). Tap the bolts through with a hammer, ensuring the square of the head engages in the holes in the channel. Put a flat washer and Nyloc nut onto each bolt and tighten just until firm.
- Repeat with the lower arms.
- Mount the interlocks onto the side guards with 4mm screws, washers and Nyloc nuts. Close the door before tightening the screws, to ensure the locks are correctly aligned with the actuators.
- Check the operation of the door and interlocks. The Nyloc nuts on the arm pivot bolts should be firm but not too tight. The door should open and close easily.
- Enable the safety interlocks.
 Both interlocks must be enabled before the MegaDumper is operated.
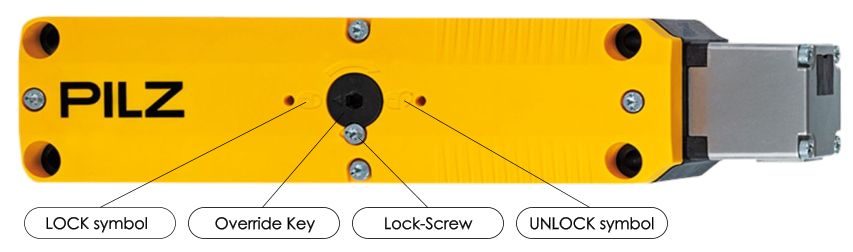
If the machine has Pilz interlocks, use a 4mm Allen key to turn the black override key anti-clockwise until the arrow points to the ‘locked padlock’ symbol, then tighten the adjacent lock-screw.
Both interlocks must be enabled before the MegaDumper is operated.
If the machine has Pilz interlocks, use a 4mm Allen key to turn the black override key anti-clockwise until the arrow points to the ‘locked padlock’ symbol, then tighten the adjacent lock-screw.- If the machine has Idec interlocks, use the supplied yellow key to turn the override switch to the 'locked' position.
- Connect the power.
- If the machines is mains-powered, connect the supplied 3-phase extension lead into the appliance inlet (opposite the control panel), and and into a suitable ~400VAC power outlet.
- If the machine is battery-powered, place the battery pack onto the platform beside the control panel, and connect the matching Anderson plugs on the power cables.
- Turn the isolator switch to the ON position.
- Insert the key into the key-switch and turn it clockwise to power up the machine.
- Check the operation of the machine, safety door and interlocks;-
- Check that the door opens and closely smoothly, with a minimum of effort.
- Check that the interlock actuators are securely attached to the door, and engage the interlocks cleanly when the door is closed.
- Check that the door is securely locked on both sides whenever the cradle is raised more than ~100mm off the ground
- Check that the door is unlocked on both sides when the cradle is resting on the ground.
- Check that the cradle raises and lowers smoothly, without jamming or squeaking.
- Turn off the power and carry out any other required commissioning tasks, such as adjusting the cradle (see Section 3.3.3 in the User Manual), installing a chute, or integrating the machine with other equipment.
- Thoroughly test the operation of the machine, both with and without a bin in the cradle, before placing it into service.


Congratulations! Your MegaDumper is now ready for use.